No products in the cart.

Avoid these frequent vector file creation errors that can ruin leather patterns and designs, ensuring professional results for your projects.
In the world of digital design, there are two primary types of image files: raster and vector. Understanding the difference is fundamental. Raster images, such as JPEGs and PNGs, are composed of a fixed grid of tiny colored squares called pixels. When you enlarge a raster image beyond its intended size, these pixels become visible, resulting in a blurry or blocky appearance—a phenomenon known as pixelation. Vector files, on the other hand, are built on a completely different principle. Instead of pixels, they use mathematical equations, lines, and points (paths) to define an image. This means the image is essentially a set of instructions for how to draw the shapes, colors, and lines. Because of this mathematical foundation, a vector graphic can be scaled up or down to any size without any loss of quality or clarity. The image remains perfectly sharp and crisp whether it's printed on a small business card or blown up to billboard size.
Just as .jpg and .png are standard for raster images, several file extensions are synonymous with vector graphics. Each format has its own specific use cases and features. The most common ones you will encounter are:
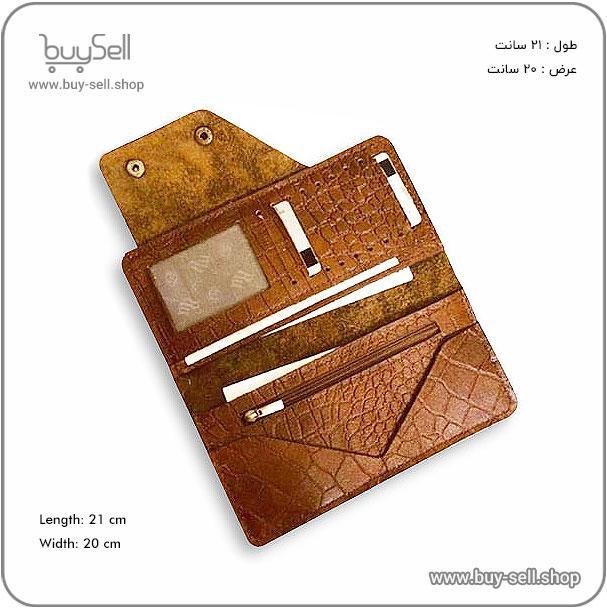
Product purchase offer: Leather Phone Case Pattern

For leather crafters and brands, vector files are non-negotiable for professional results. The primary reason is scalability. Consider a company logo. This single graphic asset needs to be used across a vast range of applications: small tags sewn onto products, etched onto metal tools, printed on packaging, and displayed large on a storefront sign. A single vector file can power all these applications without requiring a designer to create a new, sized version for each use. This ensures brand consistency and saves significant time and money. Furthermore, vector files are crucial for production techniques common in leatherworking. Processes like laser engraving, die-cutting, and hot foil stamping rely on clean, precise paths to guide the machinery. A vector file provides these perfect paths, whereas a raster image would result in jagged, low-quality edges. Having your logo, typography, and intricate designs in vector format is a cornerstone of a professional and scalable leathercraft business.
It's important to note that vector graphics are not inherently better than raster; they are simply better suited for specific tasks. The choice depends on the nature of the image. Vector graphics excel at representing clean, geometric, and graphic-based art. This includes logos, icons, typography, illustrations, and technical drawings. Their strength lies in precision and scalability. Raster images, however, are the superior choice for complex, non-geometric images that contain subtle color variations and details. Photographs are the perfect example of a raster image. While you can place a photograph inside a vector file (like an AI or EPS), the photo itself remains a raster element and will pixelate if scaled up excessively. A simple rule of thumb is: if the image is a photograph or a highly detailed painting, use a raster format like JPEG or TIFF. If the image is a logo, line art, or a simple graphic, it must be a vector file.
If you are a leather artisan receiving designs from a client or graphic designer, you need to know how to handle these files. First, always ask for the source vector files (like .AI or .EPS) in addition to any raster versions you might need for web use. To open and view vector files, you have several options. Professional software like Adobe Illustrator or CorelDRAW is required to fully edit the files. However, for simply viewing the graphics, many free programs can open common vector formats, such as Inkscape (a powerful open-source vector editor) or even Adobe Acrobat Reader for PDFs. Never attempt to convert a raster image (like a JPEG of a logo) into a vector format using automated "image tracing" tools without a designer's oversight. This process often creates messy, inaccurate paths and is not a substitute for an original, professionally created vector file.
Understanding vector file basics is not just for graphic designers; it's crucial knowledge for any business owner, including those in the leather industry. Vector graphics form the backbone of a strong, consistent, and scalable brand identity. They ensure that your logos and designs look impeccable at any size, from the smallest leather keychain to the largest promotional banner. By insisting on vector source files for all your graphic assets, you invest in the quality and longevity of your brand's visual presentation, enabling flawless execution across all your leather products and marketing materials.
In the world of leathercraft, precision is not merely an ideal; it is the foundation of quality and profitability. Incorrect scaling and sizing errors represent one of the most common and costly pitfalls for both hobbyists and professional artisans. These mistakes occur when the dimensions of a leather pattern, from a simple wallet to a complex piece of saddlery, are inaccurately translated from design to final product. The consequences are immediate and severe. A miscalculation of a few millimeters can render a meticulously stitched item unusable, leading to wasted materials, lost time, and frustrated clients. Leather is a premium, often expensive material, and errors directly impact the bottom line. Furthermore, such mistakes damage a craftsman's reputation for reliability and attention to detail, which are paramount in this field. Understanding the root causes of these errors is the first step toward eliminating them from your workflow.
Scaling errors rarely have a single cause; they are typically the result of a chain of small oversights. Identifying these common culprits is essential for prevention.
To illustrate the real-world impact of these errors, consider the process of making a simple leather belt. A customer provides a waist measurement of 34 inches. The craftsman makes a critical mistake: they use the waist measurement as the belt length. However, a belt must be significantly longer to account for the buckle attachment, the overlap on the wearer's side, and the taper at the end. Furthermore, the hole placement must be precise. An error of half an inch in the placement of the first hole can make the belt either too tight or too loose. If the craftsman also neglects to confirm the printing scale of their hole-punching guide, the entire sizing can be thrown off. The result is a belt that is functionally useless and a dissatisfied customer. This scenario underscores the necessity of a meticulous, multi-step verification process.
Product purchase offer: Leather shoulder bag and wallet set pattern

Eliminating scaling and sizing errors is achievable through a disciplined, checklist-driven approach. Incorporate these steps into your standard practice.
Incorrect scaling and sizing errors are fundamentally problems of process, not of skill. They are preventable through methodical planning, consistent verification, and a deep respect for the properties of the material. By understanding the common causes and implementing a rigorous prevention checklist, you transform potential failures into opportunities for demonstrating superior craftsmanship. The difference between an amateur and a professional often lies in this relentless pursuit of accuracy. In leatherworking, where every cut is permanent, precision is the true mark of a master artisan. It ensures that your creations are not only beautiful but also functional, durable, and perfectly fitted to their purpose.
In any technical or operational system, the quality of the line and the stability of the connection are paramount. These elements form the invisible backbone that supports all activity, whether it's data transmission, communication, or the seamless operation of machinery. Poor line quality refers to a degradation in the physical or signal integrity of the connection medium. This can manifest as noise, attenuation (signal loss over distance), or physical damage to cables. Connection issues, while often a symptom of poor line quality, can also stem from problems with the endpoints, such as faulty hardware, incorrect software configuration, or external interference. Understanding that these are often intertwined is the first step in effective troubleshooting. A robust connection is not merely about having a link; it's about having a clean, stable, and high-fidelity pathway for information or power to travel without interruption or corruption.
Several factors can contribute to poor line quality and subsequent connection problems. Identifying the root cause is critical for implementing an effective solution. The most frequent culprits include physical damage, environmental factors, and technical limitations.
When faced with connection issues, a systematic approach to diagnosis will save time and frustration. Start with the simplest and most probable causes before moving to more complex solutions. A logical troubleshooting workflow is essential.
Prevention is always better than cure. By taking proactive steps, you can minimize the risk of encountering poor line quality and connection issues. Investing in quality components and proper setup from the outset will pay dividends in reliability. Use high-grade, shielded cables appropriate for your application's length and data requirements. For critical wired connections, consider running cables through conduits to protect them from physical damage. For Wi-Fi networks, a modern router that supports the latest standards (like Wi-Fi 6) will provide better range, speed, and stability, especially in homes with many connected devices. Regularly updating the firmware on your router and network hardware ensures you have the latest performance improvements and security patches. Finally, maintain a clean and organized setup; cable management isn't just for aesthetics—it prevents tangles, strain on connectors, and makes future troubleshooting much easier.
Poor line quality and connection issues are more than mere inconveniences; they represent a critical failure in the infrastructure required for modern work and communication. Whether in a home office, a manufacturing plant, or a data center, the integrity of the connection directly impacts productivity, security, and overall operational efficiency. By understanding the common causes, adopting a methodical approach to troubleshooting, and implementing proactive prevention strategies, you can ensure that your connections remain strong, stable, and reliable. A little investment in quality and maintenance goes a long way in creating a seamless and frustration-free technological environment.
In the craft of leatherworking, layers and color management are not merely decorative concepts; they are the fundamental building blocks of a durable, beautiful, and professional-grade product. Think of layers as the structural blueprint of your project. This involves the careful application of foundational products like conditioners, sealants, and finishes, each serving a distinct purpose. Color management, on the other hand, is the artistic and technical process of applying dyes, paints, and finishes to achieve the desired hue, depth, and consistency. When these two elements are managed correctly, they work in harmony to protect the leather and enhance its natural beauty. However, misusing them is one of the most common pitfalls for both beginners and experienced artisans, leading to results that are not only visually disappointing but can also compromise the integrity of the leather itself.
A fundamental error in leather finishing is applying products in the wrong sequence or without proper drying time. Each layer needs to cure fully before the next is applied. For instance, applying a topcoat over a dye that is still tacky will result in a murky, uneven finish and can cause the layers to peel over time. Another critical mistake is incompatible product layering. Using a water-based topcoat over an oil-based dye without a proper intermediary sealant can lead to beading, poor adhesion, and premature failure of the finish. The principle of "less is more" is often ignored; over-application of any product, especially sealants and conditioners, can clog the leather's pores, making it feel plastic-like and preventing it from breathing, which is essential for its longevity.
Color management errors often stem from a lack of preparation and understanding of the materials. A primary issue is failing to test colors on a scrap piece of the same leather. Dyes can react differently depending on the leather's tannage, finish, and even its age. Applying a dark dye directly to light leather without a plan can result in uneven absorption, blotchiness, and a color that is far from the intended shade. Another pitfall is neglecting to deglaze the leather before dyeing. Many leathers, especially those with a factory finish, have a protective coating that must be removed to allow the dye to penetrate evenly. Furthermore, improper dilution of alcohol-based dyes or inconsistent application pressure can create streaks and dark spots that are nearly impossible to correct once set.
Avoiding these common mistakes requires a disciplined, methodical approach. Following a simple checklist can dramatically improve your results and ensure the longevity of your leather goods.
The repercussions of misusing layers and color extend beyond mere aesthetics. Improper layering can create a weak point in the leather's protective barrier, making it more susceptible to moisture, stains, and UV damage. A finish that hasn't bonded correctly will crack, peel, or rub off with minimal use, ruining the item's appearance and leaving the raw leather exposed. Color mismanagement can lead to bleeding, where dyes transfer onto clothing, or fading, where the color breaks down unevenly. Ultimately, these errors devalue the craftsmanship and significantly shorten the functional lifespan of the leather product, turning what should be a long-lasting item into a temporary one.
Product purchase offer: Leather wallet pattern
Mastering layers and color management is what separates an amateur project from a professional one. It requires an understanding that each step is interconnected and crucial to the final outcome. There is no shortcut to quality. By adopting a patient, systematic approach—preparing the surface, testing products, applying thin coats, and respecting drying times—you can avoid the common pitfalls. This discipline ensures that the natural character of the leather is enhanced and protected, resulting in a beautiful, durable piece that will stand the test of time. Proper technique is not just about avoiding mistakes; it is about honoring the material and showcasing its best qualities.
A vector file intended for a cutting machine is fundamentally a set of instructions. The machine's blade or laser follows the precise mathematical paths, known as vectors, that you create in your design software. The most common and critical mistake is leaving these paths unclean. This includes open paths where the start and end points do not connect, stray anchor points from deleted objects, and duplicate lines stacked on top of each other. An open path might cause the machine to cut through a section of your leather incorrectly or make an unintended travel move, potentially dragging the blade and marring the material's surface. Duplicate lines force the machine to cut over the same spot multiple times, leading to premature blade wear, unnecessary stress on the material, and a loss of cutting precision. Before sending any file to the cutter, a thorough review in outline or wireframe mode is essential to identify and delete these redundant elements, ensuring every path is a single, closed, and intentional outline.
In vector graphics, nodes (or anchor points) are the points that define the shape of a path. While software allows for incredibly complex shapes with thousands of nodes, a high node count is a significant problem for cutting machines. Each node represents a decision point for the machine's controller; it must slow down to calculate the direction and movement to the next node. An excessively high node count, often resulting from using the automatic trace function on a complex bitmap image, can cause the machine to stutter, pause, or produce jerky, uneven cuts. This is especially true for intricate designs like detailed scrollwork or small text. The solution is to simplify paths by reducing nodes. Use software tools to smooth paths and manually delete unnecessary points while maintaining the overall shape. A clean, low-node-count vector will result in smoother, faster, and more accurate cuts, preserving the sharpness of your blade and the integrity of your leather.
Not all vector file formats are created equal, and using the wrong one is a frequent source of frustration. The most universal and reliable format for transferring vector data to cutting machines is the SVG (Scalable Vector Graphics) format. It is an open standard that preserves paths, colors, and layers accurately. While formats like AI (Adobe Illustrator) and CDR (CorelDRAW) are native to their respective software, they can sometimes cause compatibility issues if the cutting machine's software cannot interpret all the embedded data correctly. DXF (Drawing Exchange Format) is another common choice but can sometimes alter stroke weights or complex curves. The best practice is to always consult your machine's manual. When in doubt, save a copy of your design as an SVG. Furthermore, ensure your design software is compatible with your machine's controlling software. A final check by importing the exported SVG file back into a vector program can confirm that all elements have translated correctly before cutting.
A perfect vector file on screen does not always translate to a perfect cut in leather. A crucial optimization step is accounting for the physical behavior of the material and the cutting tool itself. The most important concept here is kerf, which refers to the width of the material removed by the cut. A laser has a very fine kerf, while a blade has a measurable thickness. If you are designing interlocking pieces or patterns that must fit together perfectly, you must incorporate an offset into your design to compensate for this removed material. Without this offset, pieces will be slightly too large to fit. Similarly, blade drag or push must be considered. Depending on the blade type and leather grain, the blade may pull the material slightly, affecting the accuracy of very small or intricate details. Test cuts on scrap leather from the same hide you plan to use for your final project are non-negotiable. This allows you to fine-tune your design, cutting speed, and pressure settings to achieve the precise result you envision.
Follow us on Instagram and Telegram
The final step in optimization is establishing a rigorous pre-cut checklist. This systematic approach prevents simple, costly errors. Your checklist should include verifying the scale of your design—a common mistake is designing in inches but the machine interpreting the file in millimeters, resulting in a piece that is drastically too large or small. Next, confirm that all paths are closed and any intended cut lines are set to a specific color or stroke style that your machine software recognizes as a 'cut' command, rather than a 'draw' or 'score' line. Check for and remove any hidden or locked objects that might accidentally be cut. Finally, perform a visual confirmation in the machine software's preview window. This preview shows exactly the path the blade will take. Catching an error here saves leather, time, and tools. By adhering to this disciplined process, you transform your vector file from a mere digital image into a reliable blueprint for craftsmanship.

May 04, 2025

Apr 28, 2025

Apr 20, 2025
Apr 23, 2025
Oct 29, 2025

Subscribe to the Buy Sell newsletter and enjoy its benefits.