No products in the cart.
Learn to sew a versatile multi-compartment traveler's pouch with this detailed tutorial. Perfect for gifts or storage, it covers pattern pieces, materials, and step-by-step assembly tips for different sizes.
Welcome to an exciting crafting journey where we delve into the creation of the versatile Traveler's Pouch, affectionately dubbed the "traveler's trifecta." This exceptional pattern, hailing from the renowned Sophisticated Craft, is more than just a project; it's an opportunity to create a truly indispensable item. Perfect as a thoughtful gift for anyone in your life, this pouch excels not only in its primary role for travel but also serves as an outstanding storage solution for virtually anything you can imagine. Sophisticated Craft has earned a sterling reputation for patterns that combine aesthetic appeal with unparalleled usability, ensuring that every bag you make will be a frequently cherished and utilized accessory. While we've explored larger Sophisticated Craft designs in the past, this tutorial focuses on a smaller, yet equally functional, iteration of their brilliance. It's important to note that the pattern allows for the creation of multiple sizes, ensuring a perfect fit for diverse needs and preferences.
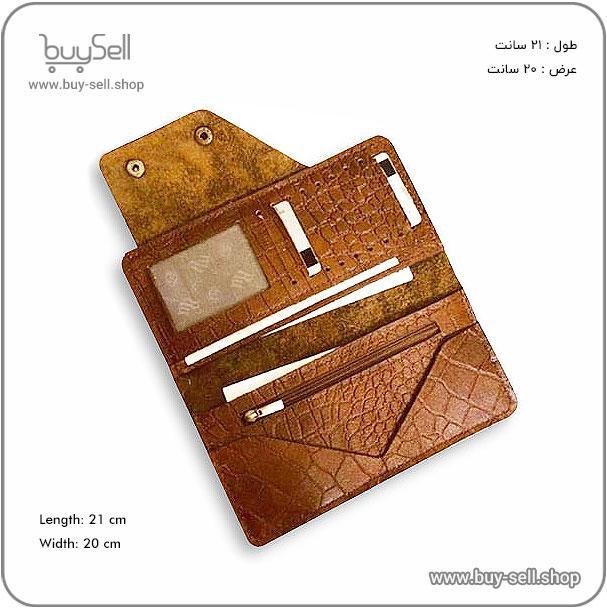
The Traveler's Pouch, regardless of its size, boasts an ingeniously organized structure, centered around three distinct zippered compartments. The design prioritizes practicality, ensuring every item has its designated place. The central compartment, a hallmark of the pouch, is notably spacious, offering a generous opening. Within this main area, you'll discover both a secure zipper pocket and a convenient slip pocket. While the pattern notes these pockets are technically optional, incorporating them is highly recommended as they significantly enhance the pouch's utility, embodying the very essence of its design. For those opting for the larger or medium sizes, an exciting feature awaits on the front panel: additional slip pockets complemented by elastic bands. These bands are ingeniously designed to hold various tools like makeup brushes, paint brushes, or pens, with a protective flap that covers the bristly or delicate parts, keeping them secure and pristine. The back panel mirrors this thoughtful design, presenting another large flap that conceals a mesh slip pocket and more elastic bands, complete with a plastic coating for added durability and protection. The smaller size, while charming, omits some of these specialized features like the plastic-coated elastic bands and clear pockets found in the large and medium versions, simplifying the construction without sacrificing core functionality.
Embarking on the Traveler's Pouch project requires a selection of quality materials, many of which are conveniently bundled in monthly subscription boxes like the Bag Making Bee Club. For a large-sized pouch, you'll generally need about a yard of exterior fabric, such as bonded nylon or water-resistant canvas, or approximately a yard and a half of quilt cotton, depending on the material's width. Lining material requirements range from 1.5 to 2 yards. Additionally, about half a yard of mesh material and a fat quarter of clear vinyl are essential for specific compartments. Zipper tape is a significant component, with roughly three yards recommended for the large size, exceeding the pattern's minimum of just over two yards, allowing for flexibility in pull placement (single or double pulls are an option for the longest zippers).
Binding, specifically a one-inch wide elastic, is another crucial element, with approximately five yards needed for both internal structure and specialized tool holders. The Bag Making Bee Club's November kit thoughtfully provides all necessary materials for crafting both large and small pouches, including pre-selected zippers, pulls, exterior and lining fabrics, and binding. A helpful tip for kit users: specific zipper and binding colors are allocated to different pouch sizes to ensure sufficient quantity for each, though creative mixing and matching is encouraged for personalized flair. This kit is ideally suited for confident beginners to intermediate sewers who possess a basic understanding of sewing machine operation, needles, and threads. For those just starting their sewing journey, the "Bag Making Babe Box" offers simpler patterns and curated materials to build foundational skills, ensuring a professional-looking finished product without overwhelming complexity. Optional additions like bag tags from Heartwood and Hide or personalized metal tags can further enhance your creation. Essential tools for this project include double-sided washable tape (1/8-inch and 1/4-inch), plastic clips, Text 45 weight thread for the needle, Mara 100 weight thread for the bobbin, a Microtex 80/12 needle, a lighter for fraying edges, a seam ripper, a 1x6 inch ruler, a chalk marking tool, an air erasing pen, and a turning wand.
Product purchase offer: Leather wallet pattern
Embarking on the creation of the versatile traveler's pouch, a design by Sophisticated Craft, requires a clear understanding of both the necessary pattern pieces and the materials. This section will guide you through the essential components for assembling this multi-functional bag, perfect for travel or everyday storage. Available in various sizes, including large and small, the large version will be detailed here, as it incorporates all possible features.
To construct the traveler's pouch, you'll need a variety of fabrics and hardware. For the exterior, approximately one yard of fabric is required. If using wider materials like nylon or water-resistant canvas (typically 55 inches wide), one yard will suffice. However, for narrower fabrics such as quilt cotton (around 44 inches wide), you'll need about one and a half to two yards of lining material. Bonded nylon is a recommended choice for both exterior and lining, as demonstrated in the tutorial. Additionally, secure about half a yard of mesh material and a fat quarter of clear vinyl, particularly if you're making the larger size, which features clear pockets.
Zipper tape is a crucial component, and for the large size, three yards are recommended, slightly exceeding the pattern's call for just over two yards to ensure ample supply. Four zipper pulls will be used, although the three longest zippers can accommodate double pulls. Five yards of one-inch wide elastic binding are also essential, serving both as internal binding and for creating tool-holding elastic bands. Don't skimp on this, as it's used extensively. Optional bag tags, like those from Heartwood and Hide or metal Oaks tags, can personalize your creation. Standard sewing notions such as washable double-sided tape (1/8 inch and 1/4 inch), plastic clips, a lighter to prevent fraying, a seam ripper, a 1x6 inch ruler, a chalk marking tool, an air erasing pen, and a turning wand will complete your toolkit. For stitching, a Text 45 weight thread for the needle and Mara 100 weight thread for the bobbin are suggested, paired with a Microex 8012 needle.
The traveler's pouch pattern is broken down into several lettered pieces, each serving a specific function in the bag's construction. Different sizes of the pouch feature varying elements; for instance, the large size includes clear pockets and additional elastic bands not found in the small version.
When working with the provided kit, be mindful of specific material allocations: the black and white striped zipper is intended for the small size, and the green zipper for the large. Similarly, pink binding is for the large size, and black binding for the smaller. This is due to material quantities, though you are encouraged to mix and match colors as desired for a unique aesthetic. For example, using black binding on pockets and sides while employing pink for flaps can create a striking contrast. Paying close attention to these pattern pieces and material guidelines will ensure a smooth and successful crafting experience for your sophisticated traveler's pouch.
The sophisticated design of this traveler's pouch, a beloved pattern from Sophisticated Craft, is truly revealed in its meticulously organized interior. Beyond the exterior aesthetics, the practicality of the bag shines through its array of thoughtfully designed pockets and flaps, ensuring a designated spot for every essential. From secure zippered compartments to versatile slip pockets and specialized brush holders, each element is crafted to enhance usability and organization for travel or everyday storage. Utilizing durable materials like bonded nylon ensures these interior features are not only functional but also built to last, providing structure and resilience.
We begin the intricate process of assembling the internal organization, starting with the central zipper pocket, then moving to the various slip and mesh compartments that define the bag's utility. Attention to detail in each step, from precisely cutting zipper tabs to carefully binding raw edges, contributes to a professional finish and the bag's overall robust construction. The large size, specifically, incorporates unique features like clear vinyl pockets and elastic bands, perfect for organizing items such as makeup brushes or art supplies, protecting them with an ingenious flap cover.
The cornerstone of the main compartment's organization is its secure zipper pocket. To construct this, begin by preparing your zipper tab, piece ZA, by cutting it into four equal segments. After carefully melting the edges of your zipper tape to prevent fraying, attach the zipper tabs to both ends of your shortest zipper. This involves sandwiching the zipper tape between two tabs, right sides together, and sewing with a 3/8-inch seam allowance. Once sewn, turn the tabs away from the zipper, press them flat, and top stitch along all four edges at an 1/8-inch seam allowance for a clean finish.
Next, prepare one of your A1 lining pieces. Measure down 1 3/8 inches from the top and cut, creating two distinct lining pieces: a top and a bottom. Mark the midpoints on the newly cut edges of both A1 pieces and on your prepared zipper tape. With the zipper facing right side up, position it between the top and bottom A1 panels. Aligning midpoints, attach the top A1 piece right sides together to the zipper and sew at a 1/4-inch seam allowance. Press this panel right side up, finger-pressing the bonded nylon, and top stitch along the seam at an 1/8-inch seam allowance. Repeat this precise process for attaching the bottom A1 panel to the remaining edge of the zipper, ensuring the zipper closes towards the left. This method ensures a neat and fully integrated zipper pocket within the main lining.
Beyond the central zipper compartment, additional slip and mesh pockets contribute to the travel pouch's layered organization. For the fabric slip pocket, take two divider pocket panels, pattern piece D and a remaining A1 lining piece. Lay them wrong sides together, focusing on the top edge, and sew along this edge at a 1/4-inch seam allowance. Then, select your binding material, ideally elastic, and cut it slightly longer than the sewn top edge. Wrap the elastic binding around this top edge, covering the stitching, and secure it with clips. Top stitch just above the bottom edge of the binding at an 1/8-inch seam allowance. Finally, position this finished slip pocket right side up onto a remaining A1 lining piece (also right side up), aligning the side and bottom edges. Baste these edges together at an 1/8-inch seam allowance and trim the bottom corners of the slip pocket to match the rounded corners of the A1 panel.
Similarly, for the mesh pockets, gather two A3 lining panels, two D1 mesh panels, and your bias tape. The process mirrors the slip pocket construction: wrap and clip bias tape around the longer top edge of each mesh pocket, then top stitch at an 1/8-inch seam allowance. Once bound, position each mesh pocket right side up onto its respective A3 lining panel, aligning the bottom and side edges, and clip in place. Baste these edges at an 1/8-inch seam allowance, ensuring to trim any excess binding or mesh to maintain a uniform shape. These pockets are crucial for visual organization, allowing contents to be seen at a glance.
Product purchase offer: leather bag pattern
For the large-sized traveler's pouch, the outer compartments feature highly specialized flap pockets designed for meticulous organization. These include clear vinyl sections and elastic holders, perfect for protecting and securing items like brushes. For the mesh pocket side, attach binding to the top edge of your mesh pocket (pattern piece F2) with a top stitch at an 1/8-inch seam allowance. Then, on one A3 main lining panel, lay it right side up. Measure in 3 1/8 inches from the left side and clip an elastic band vertically at these marks. Position the bound mesh pocket (top facing the center) onto the lining panel, aligning its bottom and sides, then baste down both the elastic and the mesh pocket at an 1/8-inch seam allowance. Ensure any overhang is trimmed neatly.
For the clear vinyl side, work with the remaining A3 lining cut, pattern piece F (flap base), and pattern piece F1 (flap cover, clear vinyl). First, mark placement lines 3/4 inch from the left, top, and bottom edges of the A3 panel. Align the flap base (F) with these marks and top stitch around all four edges at an 1/8-inch seam allowance. Next, take the clear vinyl flap cover (F1) and align its straight edge with the short edge of the attached flap base, ensuring it completely covers the plastic. Baste along this short clipped edge at an 1/8-inch seam allowance, trimming any vinyl overhang. For the elastic holders, mark a vertical line 3 1/8 inches in from the right side of the panel. Align your remaining elastic band against this line and baste its ends down. Based on the pattern's suggestions for brush storage, mark individual placement stitches on the elastic. Top stitch over each mark, back stitching and tying off threads on the back for enhanced security. This ingenious flap design not only secures brushes but also protects their delicate bristles, showcasing the thoughtful design of the Sophisticated Craft pattern.
Constructing a functional and aesthetically pleasing traveler's pouch hinges on the meticulous assembly of its core components, particularly the main gusset and its optional yet highly practical grab handle. These elements are pivotal for the bag's structure, capacity, and ease of use, making precision in each step paramount for a professional finish. This section guides you through the process of preparing and integrating these crucial parts, ensuring your custom bag is both robust and stylish, a true testament to quality craftsmanship.
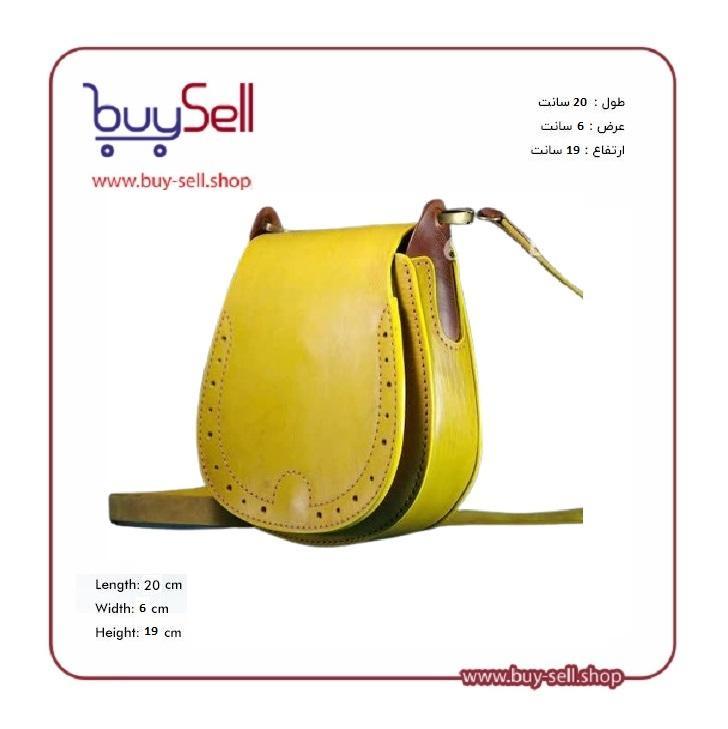
The grab handle, while optional, significantly enhances the utility of your handmade bag, offering a convenient way to carry or retrieve it. The process begins by preparing two distinct cuts for the handle, each requiring double-sided tape applied along both long edges on the wrong side. For the first handle piece, a midpoint line is marked on the wrong side. After removing the paper backing from the tape, the long raw edges are folded back, wrong sides together, to meet this midpoint, creating a clean, rectangular strap. The second handle piece is prepared similarly, but instead of folding to a midpoint, the raw edges are folded back to meet lines marked 3/4 of an inch in from the long edges, leaving a slight gap between the folded edges. This technique imparts a unique, dimensional quality to the handle.
Once both handle pieces are folded, double-sided tape is applied along the back of the narrower piece, specifically where its raw edges meet. The paper is removed, and this narrower piece is then flipped and centered, wrong sides together, onto the wider strap. This creates a visually appealing "pyramid bit" with added dimension, moving beyond a simple rectangle. The next step involves topstitching along all edges of the assembled handle. When topstitching the long edges, it's recommended to use the narrower piece as a guide, sewing at an eighth-inch seam allowance. This ensures a consistent and neat stitch that reinforces the handle for long-lasting durability, an essential aspect of any well-crafted leather or fabric accessory.
The central zipper gusset forms the main structural body of the traveler's pouch, dictating its overall shape and internal volume. This assembly begins with preparing the zipper tabs. Using narrow double-sided tape, attach it along the long edges on the wrong side of the zipper tab material. A midpoint line is marked on the back edge, and the raw edges are folded back to meet this line, wrong sides together. Unlike previous tab constructions, this folding is performed only once to prevent excessive bulk. The tab is then flipped right side out and topstitched along all four edges at an eighth-inch seam allowance. Once stitched, the tab is folded in half, short edges meeting, and cut along the fold, yielding two finished zipper tabs for the main gusset.
Next, the main zipper is integrated into the gusset panels. A lining zipper gusset panel is laid right side up, and double-sided tape is applied along one long edge. The zipper, with pulls already attached, is placed right side up onto this tape, ensuring a slight overhang on both ends. An exterior zipper panel is then aligned, right side down and right sides together with the zipper tape, precisely matching the lining panel. This triple-layer assembly is sewn along the taped edge at a quarter-inch seam allowance, securing all three components. After pressing the exterior and lining panels away from the zipper and wrong sides together, topstitching is applied along the zipper seam at an eighth-inch allowance, followed by basting along the short and other raw edges. This entire process is then meticulously repeated for the other side of the main zipper, ensuring a symmetrical and secure central gusset.
With the central zipper gusset panels prepared, the next crucial steps involve attaching the compartment base and the grab handle, completing the core structure of the bag. First, the main zipper's ends are melted to prevent fraying, and the pre-made zipper tabs are folded wrong sides together, then centered over each end of the zipper, aligning with the gusset edges. These tabs are basted in place at an eighth-inch seam allowance. Following this, the compartment base is attached. The lining base panel is laid right side up, with the zipper gusset top placed right side up over it, matching the two short edges. The exterior base panel is then laid right side down, right sides together with the exterior of the zipper gusset. These layers are sewn along both short clipped edges at a 3/8-inch seam allowance, with corners carefully trimmed.
The base panels are then flipped wrong sides together, exterior side out, gently tugged to ensure they lie flat and all raw edges align perfectly. Topstitching is applied along the seams on both ends at an eighth-inch seam allowance, and the long raw edges are basted at the same allowance. Before proceeding, midpoints are marked on the base panels and the top zipper panels of both sides of the gusset, typically using scissors for the base and a marking tool for the zipper edge to avoid visible marks. Finally, the prepared grab handle is basted onto the main gusset. If using a single zipper pull, the handle is positioned on the side where the zipper closes fully, about a quarter-inch below the seam under the zipper. Both ends of the handle are individually clipped and basted at an eighth-inch seam allowance, securing its placement and preventing it from being overlooked in subsequent assembly stages. This thoughtful integration of components ensures a strong foundation for your durable and practical traveler's pouch.
The journey to a robust traveler's pouch begins with meticulously securing its internal architecture, much like establishing the foundational layers of a secure Web3 application. We start by preparing the central compartment pockets. This involves cutting zipper tabs (piece ZA) into four equal segments, melting the zipper tape edges to prevent fraying—a critical step akin to data integrity checks before processing sensitive information. These tabs are then sewn onto the shortest zipper, sandwiching the zipper tape between two tabs, right sides together. After stitching, the tabs are turned away and topstitched along all four edges at an eighth-inch seam allowance for a clean, reinforced finish. Next, an A1 lining piece is cut to create top and bottom panels. Midpoints are marked on these panels and the zipper tape, ensuring precise alignment. The zipper is then carefully attached, right side up, between the top and bottom lining pieces, with careful consideration for the zipper's closing direction (towards the left for optimal functionality). This process, demanding precision in alignment and stitching, mirrors the careful deployment of smart contracts, where every detail impacts overall security and functionality. We then add binding to the divider pockets, carefully wrapping elastic around the top edge and topstitching it, creating a flexible yet secure internal structure for organization. Slip pockets and mesh pockets are similarly basted onto their respective A1 and A3 lining panels, trimming corners for a neat, rounded finish, much like optimizing code for efficiency without compromising security.
Building the main gusset, the structural backbone of the pouch, requires careful preparation of the grab handle and zipper components. If opting for a grab handle, double-sided tape is applied to the wrong side of two handle cuts, which are then folded to create a clean, dimensioned strap. One piece might be folded to meet a midpoint, while another is folded to marked lines, creating a subtle visual interest—an aesthetic choice that, in Web3, might correspond to a user interface feature designed for both utility and appeal. The handle is then topstitched along its edges, guiding the stitches by the narrower piece for a precise finish. Zipper tabs for the main gusset are similarly prepared with double-sided tape, folded to meet a midpoint, and topstitched along all four edges before being cut in half. The main zipper, complete with pulls, is then integrated with the lining (B2) and exterior (B2) gusset panels. Double-sided tape is applied, and the zipper is precisely aligned and secured, ensuring exterior and lining panels are sewn right sides together with the zipper sandwiched between. After sewing at a quarter-inch seam allowance and pressing the panels away from the zipper, they are clipped wrong sides together and topstitched. This methodical process of joining layers and reinforcing seams is analogous to implementing Two-Factor Authentication (2FA) for a digital wallet; each layer adds a necessary barrier against unauthorized access. The compartment base (BB2), both exterior and lining, is then attached to complete the main gusset, with corners trimmed and seams topstitched, ensuring a clean, robust foundation. Marking midpoints on all gusset components at this stage is crucial, serving as alignment guides for subsequent attachments, much like predefined consensus points in a decentralized network ensure synchronized operations.
With all major components prepped and midpoints marked, the assembly phase begins, demanding an understanding of orientation and layering that parallels the intricate deployment of a complex Web3 application. First, the grab handle is basted onto the main gusset, strategically placed a quarter-inch below the zipper seam. For users of a single zipper pull, aligning the handle with the zipper's closed position offers ergonomic access, a small but significant detail for user experience in both physical and digital interfaces. Then, the outer zipper gussets are attached to the main gusset. Ensuring all zippers close in the same direction is vital for a logical and intuitive user flow, preventing the kind of confusion that could lead to user errors in a Web3 transaction. These gussets are clipped right sides together, aligning midpoints, and basted at an eighth-inch seam allowance. The process involves carefully wrapping the outer gusset around the center, matching up the marked midpoints on the base panels and the top zipper edges. This careful alignment and preliminary basting is akin to staging a multi-part smart contract deployment, where each module must correctly interface with the others. Subsequently, the prepared center compartment panels, including those with mesh or slip pockets, are carefully integrated between the gusset and the newly attached zipper. This step involves folding the zipper back, aligning the compartment panel (linings right sides together with the gusset material), and meticulously clipping all midpoints. Navigating the bulk of multiple layers, particularly at corners, requires patience and precision, ensuring no accidental stitching over zipper teeth or material folds, which could be catastrophic, much like an unhandled error in a blockchain transaction or a phishing attempt targeting an EOA (Externally Owned Account) where a private key directly controls assets. Unzipping the outer compartment zipper can provide necessary flexibility, allowing for smoother stitching around the intricate curves.
follow us in telegram & instagram
The culmination of the traveler's pouch construction is the application of binding to all raw seams, transforming vulnerable edges into robust, finished elements. This final binding step is not merely decorative; it's a critical layer of reinforcement, akin to the cryptographic binding that secures data on a blockchain or the unwavering commitment to a secure Seed Phrase (the master key to your digital wallet). After each panel and gusset is sewn, the corresponding zipper is opened fully to facilitate the careful wrapping of elastic binding around the freshly sewn seam. This process is repeated for every seam connecting a panel to a gusset, with each binding layer topstitched at a quarter-inch seam allowance, effectively sealing and protecting the construction stitches beneath. The deliberate overhanging of binding at the ends, prior to trimming, ensures a complete and secure wrap, preventing any unraveling—a physical analogy for ensuring transaction finality in Web3, where once confirmed, changes are irreversible. For optimal security, especially in physical items designed to hold valuables, every connection point, every seam, must be rigorously checked for integrity, just as one would audit smart contract code for vulnerabilities or diligently practice strong security habits, like using 2FA for all digital accounts. This meticulous attention to detail at every stage, from material selection to the final binding, culminates in a traveler's pouch that is not only functional and aesthetically pleasing but also inherently secure, ready to safeguard essentials on any journey. The satisfaction of a well-crafted item, much like a well-secured digital asset, comes from the confidence in its robust and thoughtful construction. Always verify your work and remember that careful orientation and methodical stitching are key to avoiding errors, preventing issues that could compromise the integrity of your creation or, by analogy, your digital assets against phishing or unauthorized access.

May 04, 2025

Apr 28, 2025

Apr 20, 2025
Apr 23, 2025

Oct 25, 2025
Subscribe to the Buy Sell newsletter and enjoy its benefits.